Back to School! Sign Preparation 101
It’s that time of year again! Whether school has started or will start soon, we have some pointers for you. Now is a great time to make sure your display is running at 100%, to schedule as many things in advance as you can, and to use all the school-related content that Daktronics offers. We’ll go […]
Daktronics Commercial Software Training on 8/19/2015
Categories: Venus 1500 Training

It’s that time of year again! Whether school has started or will start soon, we have some pointers for you. Now is a great time to make sure your display is running at 100%, to schedule as many things in advance as you can, and to use all the school-related content that Daktronics offers. We’ll go over all these topics over the next 3 weeks! With that being said, let our first class begin!
DISPLAY HEALTH
If you haven’t used your display all summer, used it sparingly, or have just had it running on autopilot because you scheduled out the summer way back in spring, now is the perfect time to give your display a checkup! By checking now before school starts or really gets back into the swing of things, you can avoid any chance of down time.
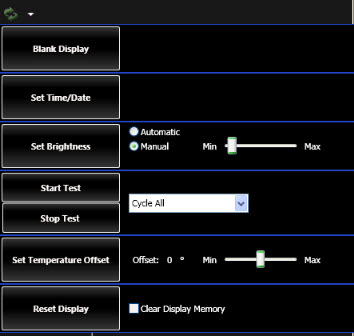
Let’s get started by clicking on the Display Tools button. This is the little white button, shaped like a triangle, to the right of the Select-A-Display dropdown. Once you click the button, you will see a dropdown with several different options for display maintenance, such as setting the time and date, adjusting the brightness and temperature offset, and blank, test, and reset a display.
Blank Display stops the running schedule, which blanks the display.
Set Time/Date updates the time and date on the selected display’s internal clock to match that of the computer running Venus 1500 software. Any offsets for time zone settings are taken into account.
Brightness can be set to automatically adjust or to manual adjustment.
- Automatic is the recommended setting, but can only be used with displays that have an external light sensor installed at the display site. The display’s brightness level adjusts automatically based on readings from this light sensor.
- Manual brightness control allows you to adjust the intensity of the display using the Min/Max slider bar.
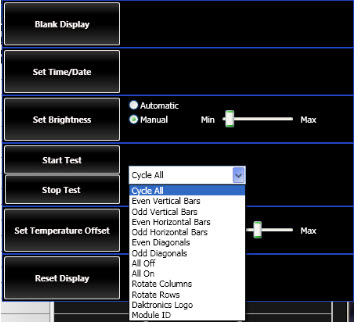
Test Patterns assist maintenance personnel troubleshoot the display.
- Select the desired test from the drop-down menu. Cycle All runs all of the listed tests. Click Start. When testing is complete, click Stop Test.
![Test Patterns]()
Temperature Offset adjusts the external temperature sensor at the display site to reflect the true outside temperature. The offset increases or decreases the temperature by the specified amount before showing it on the display.
- Use the up and down arrows to specify the amount of offset. Click Set Temperature Offset to activate the adjustment.
Reset Display restarts the selected display. Refer to the display’s manual for boot up information that appears upon reset.
- To remove all presentations and the schedule saved on the display, check the box next to Clear Display Memory, then click Reset Display. When the confirmation dialog box appears, click OK to continue resetting the display.
- Caution: Resetting the display temporarily interrupts operation and is typically used only during troubleshooting.
Memory Cleanup defragments the display’s memory. After clicking Memory Cleanup, a Progress window opens and shows the status of the defragmentation process.
If you have never used any display tools before or aren’t sure how to use these features, don’t hesitate to contact a trainer for help. That’s what we’re here for!
Like we always say, thanks for reading and please let us know your ideas for future blog posts! See you next week!


