Importing Headshots with Busy Backgrounds
Today we’ll talk about importing headshots using Venus®1500 software. Use the Right Photo for Your Message In outdoor advertising, we are limited to 2-3 seconds to grab the driver’s attention, and then deliver the message in as few words as possible. So, if possible, don’t choose a detailed picture for your ad like the one […]
Daktronics Commercial Software Training on 9/17/2014
Categories: Venus 1500 Training

Today we’ll talk about importing headshots using Venus®1500 software.
Use the Right Photo for Your Message
In outdoor advertising, we are limited to 2-3 seconds to grab the driver’s attention, and then deliver the message in as few words as possible. So, if possible, don’t choose a detailed picture for your ad like the one to the right. Customers may miss your message while they spend valuable time figuring out the picture.
You want passersby to focus on the person first, then the message. For display content, cut confusing backgrounds out and go with a very simple color or subdued background pattern. Also, grab the audience’s attention by using bright, contrasting colors or isolating the subject of the picture.
Backgrounds in many professional photographer pictures for magazine ads have brush stokes, colors, patterns, etc., that look great in the photo. But a photo like that on a digital display will confuse the eye.
Graphic Artist on Staff?
If you’re lucky enough to have a graphic artist on staff, he or she can do some unusual things to enhance the colors, fix the exposures, or isolate parts of the photo for use.
If you don’t have a graphic artist, check out a site we use every now and then – http://pixlr.com It’s a web-based photo editing program that will let you apply filters, blur backgrounds, resize, and more. Use the Help guide to find tutorials if you’re new to that type of program. Below is how the content would look if we minimized the noise by blurring the background.
No Graphic Artist?
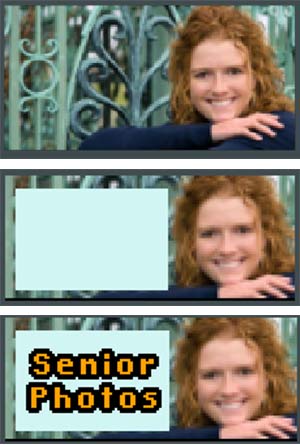
Assuming you don’t have anyone to blur the background for you, let’s look at how to recreate the message using a text box. Follow these steps:
- Position the subject of the photo to one side of the layout.
- Add a text box over the layout.
- Fill the text box with a complementary color.
- Add text in a contrasting color, and don’t forget the outline!
Here is what the photo at the top of the blog post looks like as we build our presentation in a 48 x 112 Galaxy display. To add color to a text box, refer to blog article Add Color Using Text Boxes – Part 2
GalaxyPro 4 Opacity Text Box
If you have a GP4 display, you can make the text box color opaque. The graphics below show what the opacity text box would look like for an 80 x 160 GP4 display.
To create the opacity for a GP4, follow these instructions:
- Add a text box and stretch it out to the desired size.
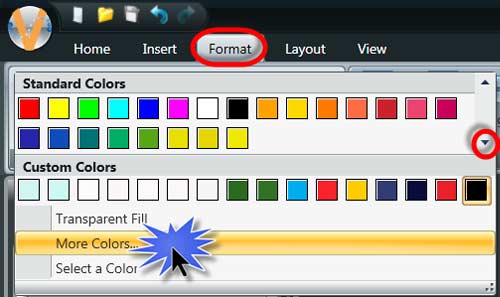
- Click the Format tab and then the More drop down arrow.
- Click More Colors under the Custom Colors heading.
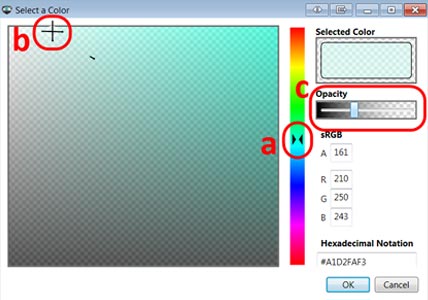
- In the Select A Color window,
- Move the slider bar up/down to get the desired color.
- Click and move the cross hairs to the desired shade.
- Drag the Opacity bar to the right to make the color opaque.
- Click [OK] to add the color to the text box.
- Now just add a text box and enter your text.
You’ll notice that we cropped and resized our example photo to make it look the best for our message. Don’t miss the next post: Cropping and/or resizing headshots.


